Face-nailed flooring, where nails are remaining uncovered, is some thing you don’t see very typically. It’s mainly located in older—like 100 years or more—homes or buildings, although you might arrive across it in some more recent households the place it’s applied to assist foster a more rustic aesthetic. Most usually facial area nailing is utilised on wide-plank flooring, from 6 up to probably 20 inches across. I not long ago experienced to look at the strategy when I replaced broken flooring in my summer months kitchen area, at first make about a century in the past.

These days, normal wooden-plank flooring (also get in touch with tongue and groove) is blind nailed by the tongue edge. To do this, you travel the nail at an angle at the edge of the tongue, in which it will be covered when the groove edge of the future board is slipped above the tongue. You can do the nailing manually, but mechanical nailers are a great deal a lot quicker. With wider boards while, this leaves a major width of each and every board with out fasteners which is prone to warping, generating the floor uneven. The present day solution to this is to use screws by means of pockets in the confront of the flooring, and then conceal the fasteners with a wooden plug in the pocket.

When I manufactured the determination to exchange my flooring, keeping the building strategies and supplies initially used, I was rather substantially locked into experience nailing the flooring by hand. I requested 400 sq. toes of tongue-and-groove yellow pine in 8-inch-broad, 1-inch-thick planks. Nowadays, wooden flooring is typically 3⁄4-inch thick or less—because it’s normally laid more than a plywood subfloor. In the circumstance of more mature properties like mine, the ground was laid directly on the joists or structural supports, which were being frequently not uniformly spaced—I have some as significantly as 2 ft aside. So the boards require to be thicker.
Deciding on the Nails
Though nails applied for confront nailing have large holding power, they are also regarded as ornamental. Because of to that, and their extra laborious production method, they are considerably far more highly-priced than typical wire nails. These have to search the aspect, and they could have square/rectangular, wrought, or rose heads. The nail alone will have a tapered wedge condition, with a huge profile from one aspect, and a flat square tip. They are referred to as square nails or lower nails, for how they have been created.

The blunt, sq. suggestion, when hammered, tears by wooden fibers, breaking them as it passes as a result of the wood. The wedge form pushes the finishes of the fibers down and receives tighter as the nail is pushed down. These wood fibers act like angled teeth that help protect against the nail from backing out, providing it a good deal extra holding power than present day round nails that drive their way among the wood fibers.

The head of the nails you use will depend on your software. For tougher wood species, you’ll use nails with a smaller sized, rectangular head. Bur for gentle wood, like the yellow pine I used, you’ll want a greater-head nail that will be more durable to pull out of the wood. I ended up deciding upon Tremont’s 2.5-inch sq.-slash, fire door clinch nails, with a black oxide complete. These have a nicely formed large head and a reverse taper on the shaft near the head that allows the wooden fibers take it easy and close back again in on the nail, locking it in spot.

Spacing the Nails
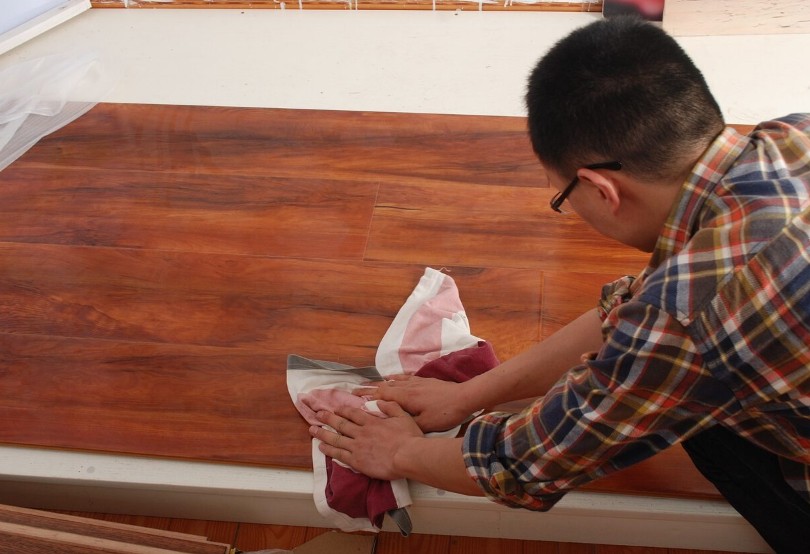
When nailing throughout the width, you’ll want two confront nails for boards up to 8 inches broad, and a few nails for anything more than 9 inches. The nails closest to the edge should really be 1 to 1.25 inches from it. You will discover in the pictures that mine are about 2 inches from the edge—and there’s a reason for that. My quite previous floor joists were being warped and uneven. Nailing in a tiny farther permitted the edge of the board to flex a minimal, so it was easier to get the groove on the subsequent board to slip about the tongue. That does danger the edge of the boards cupping above time and the ground getting uneven. But the flooring is wavy in any case, with a superior 2 inches of deviation from level. Chances are you will be working with reasonably level sub-flooring, even though, so you are going to want to nail close to the edge.
Each individual row of nails, symbolizing the place you would historically nail into a joist, ought to be 26 to 30 inches apart. The nails are not inexpensive, so diligently determine how several you will need to have, then add 5-10 percent to be certain you do not lower it also near.
Hammering the Nails
Prior to you start hammering away, exercise driving a few of nails into some scraps of wood. They’re not heading to sink in the way standard nails do. The to start with thing to know is that you need to orient the flat aspect of the nail parallel to the grain. The nails will get harder to driver the farther in they go, and if the extensive side is perpendicular to the grain, it can break up the wooden apart. You are going to want to sink them in flush with the face of the board, without leaving a hammer dimple in the wooden. If you plan on sanding the flooring before ending it, sink the nails just down below the area with a nail established.
On the to start with board, along the wall and at the finishes of every single board, use a common flooring nail that will be hidden by your baseboard trim. I used hardened, spiral-shank nails, then made use of a nail set to get them flush with the floor. Begin with the groove aspect to the wall, leaving the tongue to the outside, so every single board’s groove will suit above the pervious board’s tongue.

Until you get the dangle of spacing your nails reliably, you can use a framing sq. marked with a Sharpie to hold the spacing steady. Or you can just reduce a proper triangle out of cardboard and mark the spacing. In both situation, you can just level the tip at the final nail on the past board and you’re all set. But above all, do not anxiety about executing it properly it is the imperfection that provides face nailing its charm.
Closing the Gaps
All of your large-plank flooring is not going to be properly straight. At some place, you will have a gap in the middle or at each ends. This is a reasonably quick issue to fix. Acquire a slash-off scrap of flooring and minimize throughout the center, with the grain, on a shallow angle. At the issue the place the hole is major, line up the items as if you were putting in the upcoming board. Then screw down the top rated piece, with the tongue, and hammer the lessen piece, which gets a wedge, to squeeze the gap closed.

The Last Board
The really final board will be difficult to set up. There are two methods. If you’re laying this floor down more than a subfloor, you can trim the board to the correct width on the experience, and then remove the decrease lip of the grove. This will permit the board to drop in put and be experience nailed. Use typical flooring nails at the edge of the wall, just as you did on the initially board.
If you’re nailing the flooring appropriate to the joists, and the bottom is uncovered or obvious from down below, you’ll want to measure the width it desires to be, and then subtract the width of the tongue. This will allow the board drop into place. Then you can use a crow bar against the wall to very carefully slide the groove around the tongue of the former board. This will depart a small hole at the wall, but it will be coated by your baseboard molding.
And there you have it: a properly mounted, handsomely previous-fashioned wood ground.
This material is produced and preserved by a third celebration, and imported onto this web site to help buyers deliver their e-mail addresses. You may perhaps be able to obtain additional details about this and equivalent material at piano.io